Rail First Method
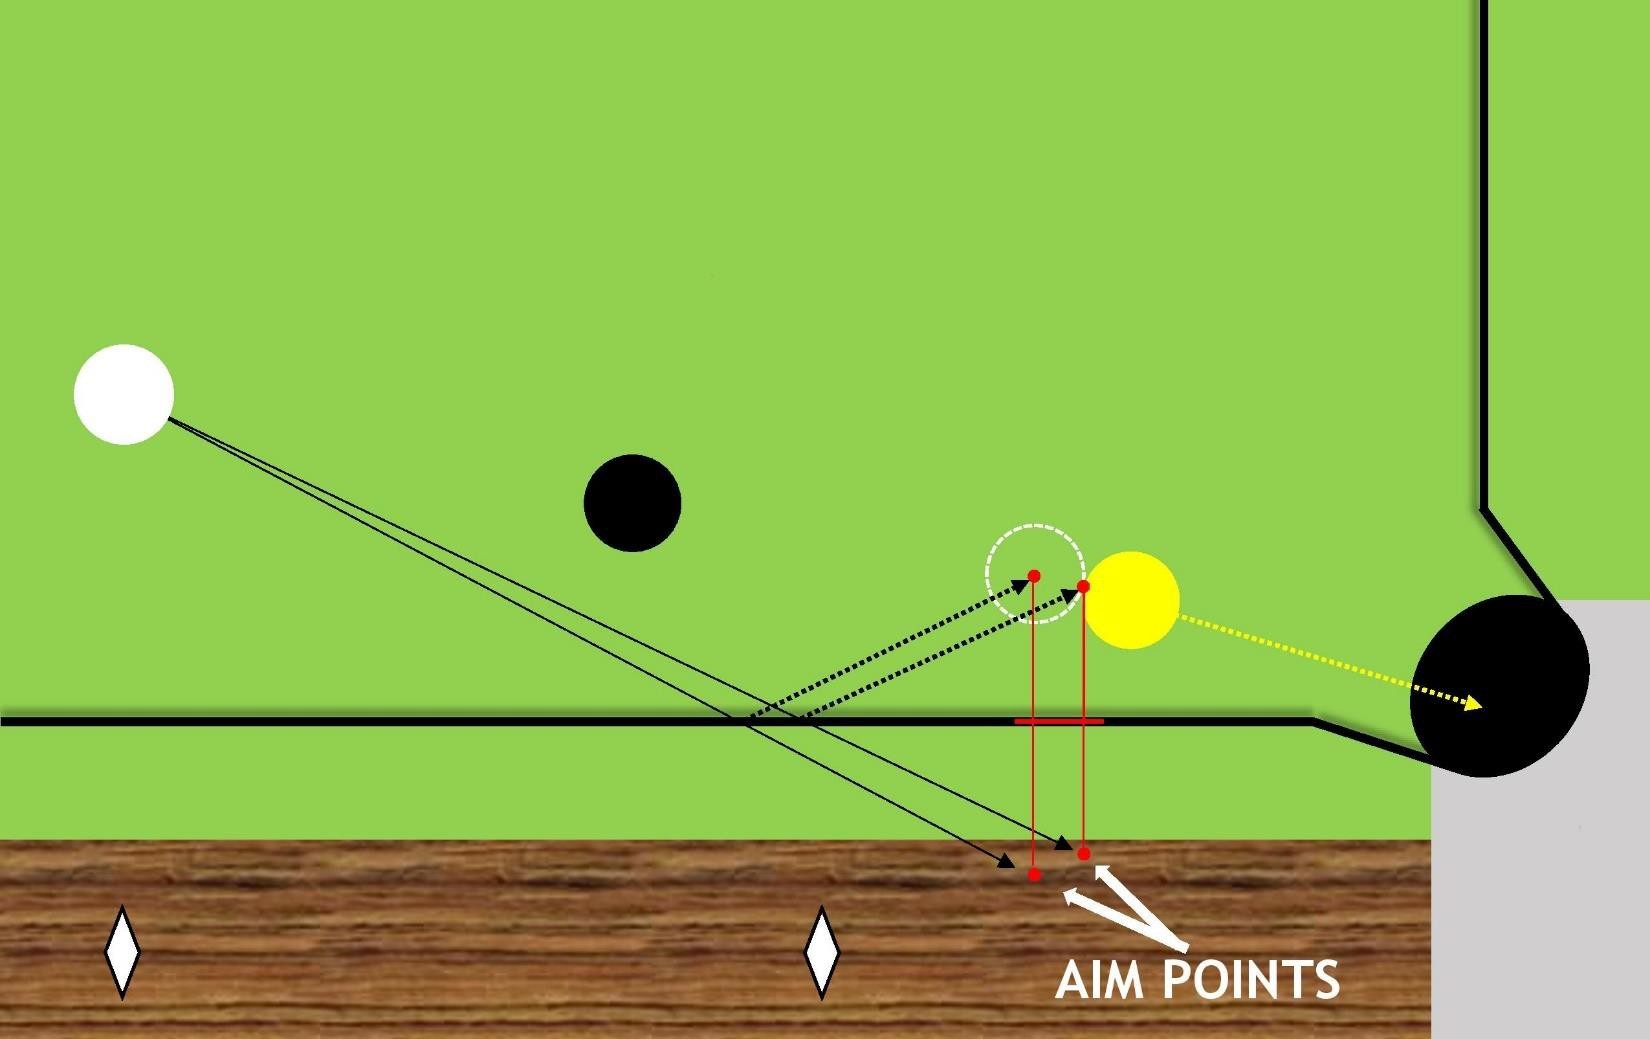
Use the rail first method for near pocket object balls that are otherwise blocked. To do this you will begin with the ghost ball method. Find the center of the ghost ball or contact point in line with the direction you want the object ball to travel. Visualize, or measure, the line from the center of the ghost ball perpendicular to the nose of the rail. Extend that same distance further out onto the rail from the rail nose. The end of that line is your aim point. Depending on the ghost ball or contact point to determine aim point the applied spin will vary.
As the object ball and/or cue ball is farther from the rail and/or pocket the difficulty due to precision increases. As the angles steepen, aim point and spin adjustments must be applied. This is also affected by the particular reactivity of a table's rails. Below is the basic illustration. If the object ball is closer to the rail, (less than a ball) you will need to aim significantly thicker to the aim point the closer to the rail it is.
A final caveat is that the scratch potential is high. As the cue ball caroms off of the object ball there is a high tendency for it to travel to the other corner pocket on that short rail. Either ensure the cue ball path is not directly into the pocket, is blocked by other balls, or control the speed.
Here is the drill to learn rail first shots from three cue ball positions that cover and verify effectiveness for larger table areas. There are 4 sets of 3 shots each in the drill that cover two object ball positions, and three cue ball positions. The two object ball positions are one diamond from the corner pocket, and either one or two balls off of that rail. The three cue ball positions generally represent degree of angle: shallow, steep, acutely steep.
Additionally, there are two rail first aiming methods employed as discussed on the previous page. In both cases, it is important to measure the distance accurately. When measuring using the ghost ball spot, be sure to be precisely at the center of the ghost ball. When measuring from the contact point, measure precisely from the contact point. This is more difficult than what you may have seen before. Some use their fingers or cue in front of the ball. However, the curvature of the object ball and the thickness of the cue or finger contribute to imprecision. Instead hover the cue above the object ball so that the line created to the rail is actually perpendicular to the rail and contact point.
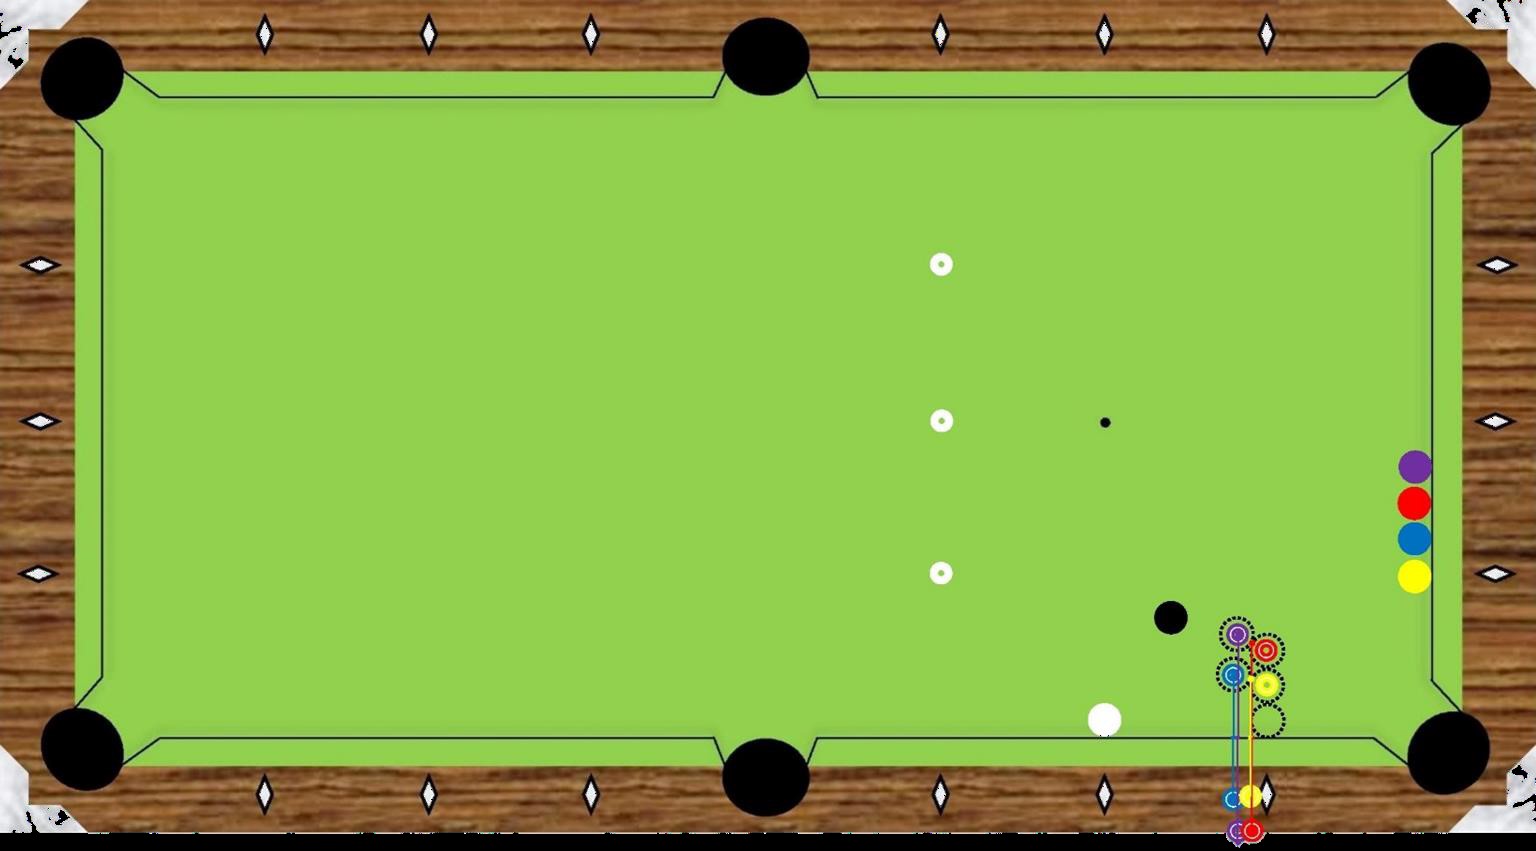
The set up requires 11 donuts, cue ball, blocking ball, and 4 object balls. Place the 3 cue ball position donuts at the third long rail diamond from the corner of interest, and for each diamond of the short rail. Place two donuts for the object ball positions; 1 and 2 balls off the first long rail diamond. Place two donuts for the ghost balls of the corresponding object balls aiming to the center of the corner pocket. Finally, use a straight edge ruler to precisely measure from the contact points and ghost ball centers to the nose of the rail. Then duplicate that length out onto the rail to place the four aiming point donuts. (Video 0:26)
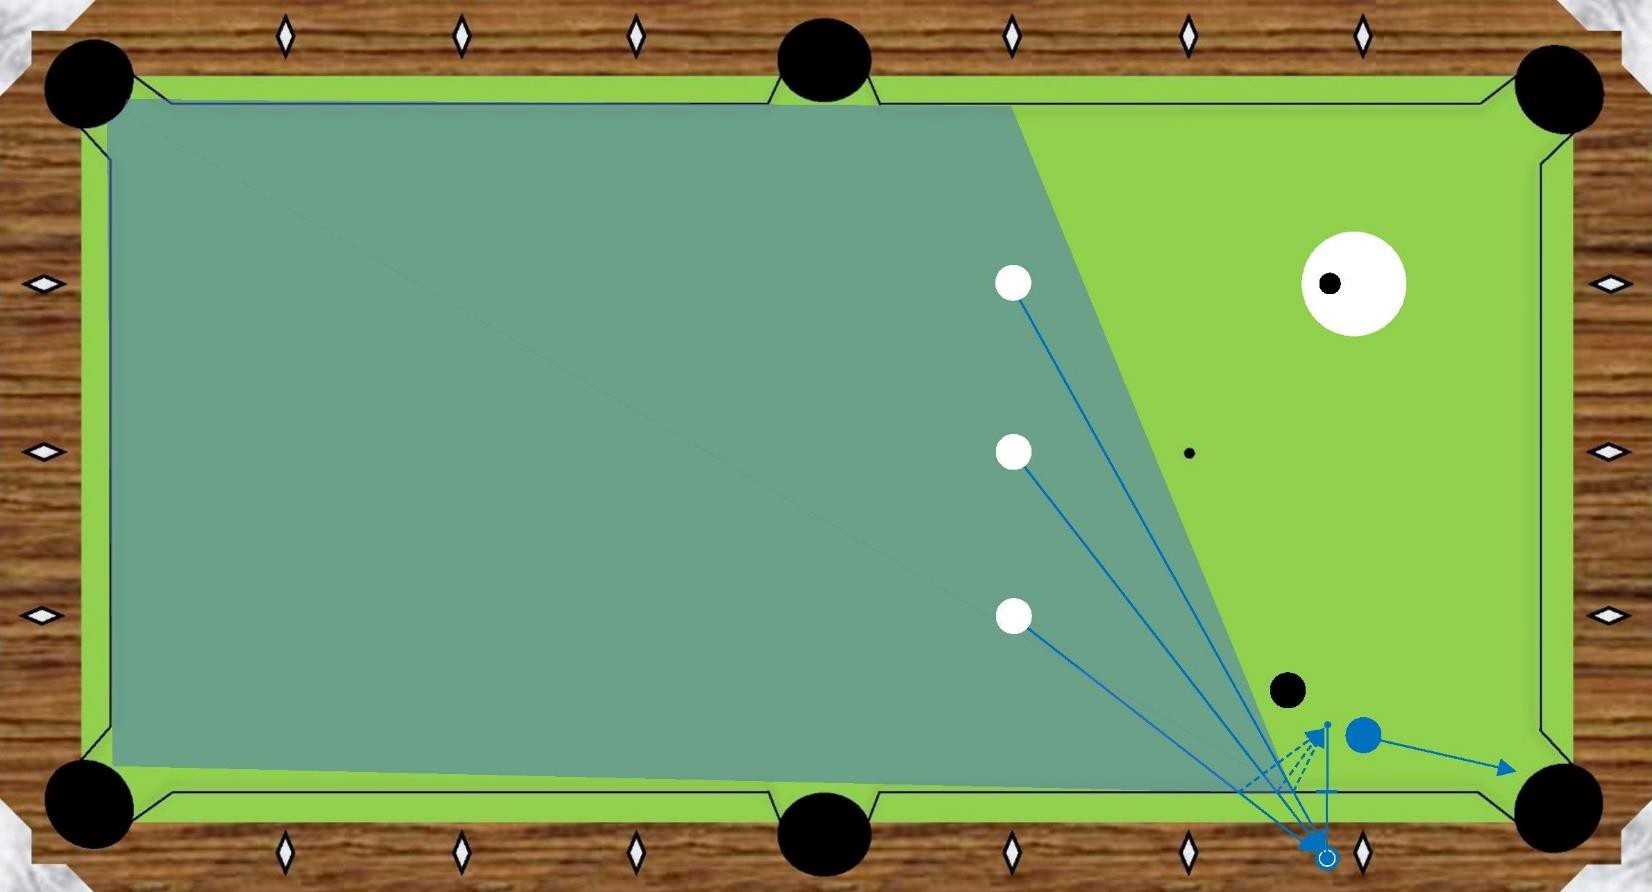
The 1st set (1 Ball) in the drill uses the aim point for the contact point at one ball off the rail. This method requires a tip or more of follow depending on stroke. At the steeper angles you may need to increase cue ball speed if you have a slower cloth. At steeper angles hitting the contact point will be a thinner hit, and thereby transfer less energy into the object ball. Again, at one ball off the rail with a fast cloth you may still be able to transfer enough energy into the object ball to make it into the pocket.
Note in the above image the third, acutely steep, cue ball position is not included in this first set. This is because of the low percentage of success. It may be possible to make it using the contact point method with cooperative rails, cloth, speed, and stroke, but very unlikely. Feel free to try, and learn for yourself. You could aim thin to the aiming point, and add a touch of spin (left in this example), and this will help. However, you will see in the next set, the second method is superior.
In this, and the other examples, there is a shading of the table in the color of the object ball employed. This shaded area is the complete area that has a strong possibility of success for that method. As you approach the perimeter of the shading, the percentage of success decreases. Again, if you get beyond the perimeter of the shading, you can still make the object ball, but will need to make adjustments: thinner/thicker aim, spin and/or speed adjustments. (Video 13:20)
The 2nd set (2 Ball) now uses the ghost ball position, and is still one ball off the rail. Using this method, a tip or more of spin (left in this example) is employed. Using the ghost ball allows the incoming angle to be wider than when using the contact point position. As such, spin is required to contact the object ball well. This method allows the cue ball to strike the object ball more fully, and more easily transfer energy into the object ball. However, the stroke needs to be more precise & consistent to be reliable than the contact point method.
In this case, you will find as illustrated, that all three cue ball positions are now available for success, and the effectiveness shade is a little larger. Again, as the angle to the rail increases in steepness you may want to increase your speed somewhat. You will know this if the object ball misses the pocket, and hits the short rail. If anytime during the drill the object ball hits the long rail first you must either slow the cue ball speed, or increase the spin.
So, in these first two sets there are many areas where either method is effective. So, which one to choose? It really comes down to preference, and upcoming cue ball position. You will find one method or the other more or less effective for your skill level. The other factor is the cue ball exit position. The variation in speed and spin gives different results, and you will see & learn what your cue ball does. (Video 14:36)
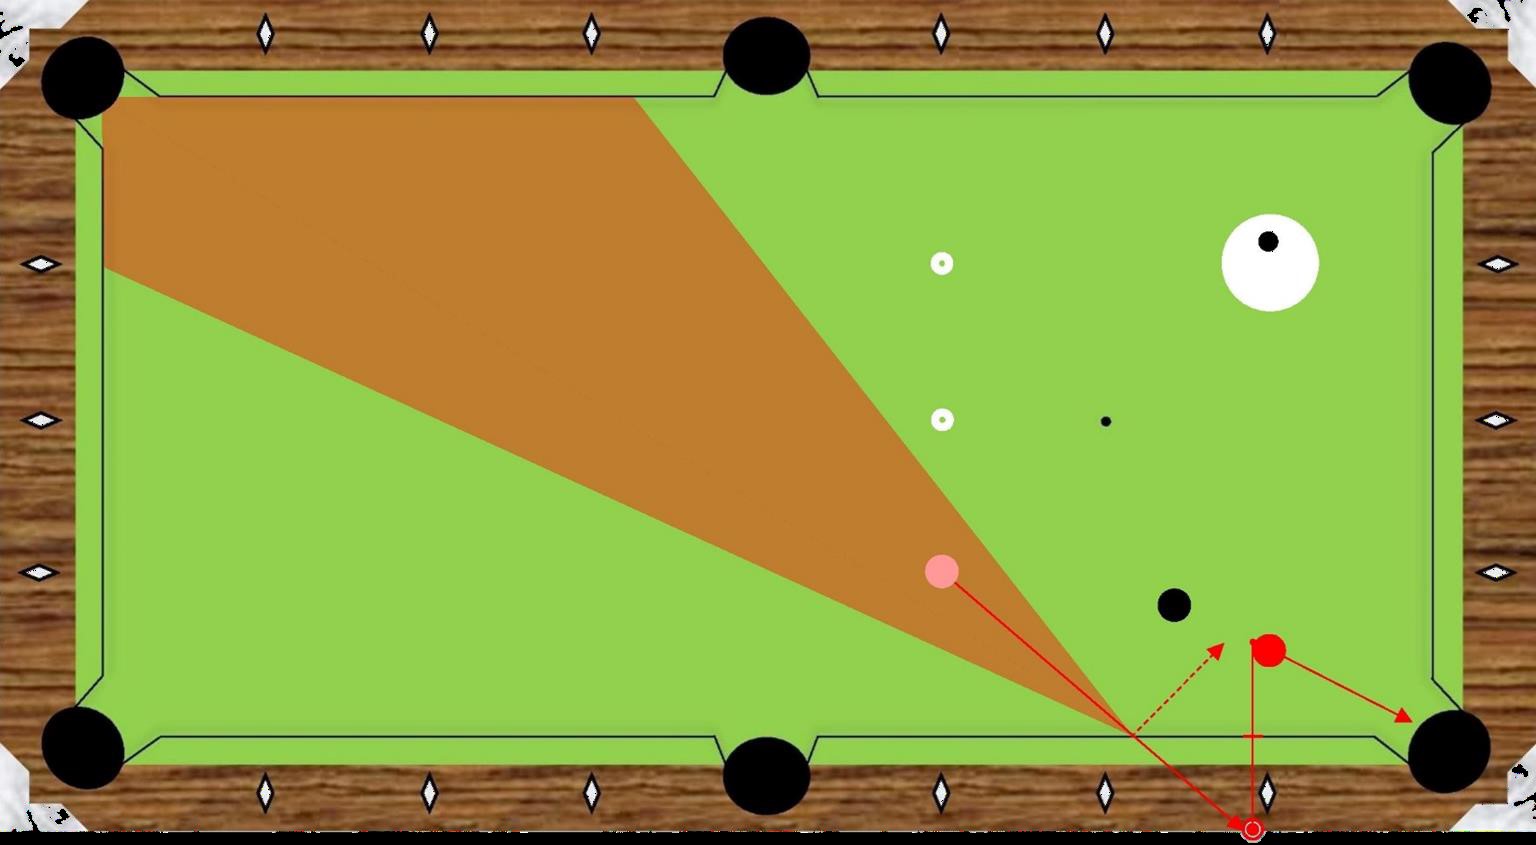
The 3rd set (3 Ball) returns to the contact point method, but now the object ball is two balls off of the rail. Notice now, how the effectiveness shade of this set is extremely diminished. As such, it is not the preferred method. However, if your cue ball control is not precise & consistent, this may be your only option.
Additionally, as compared to the contact point method with the object ball only one ball off the rail, in this case you will often need to employ a faster cue ball speed. This is due to the thin hit only transferring limited energy into the object ball. Transferring enough energy to get the object ball to the pocket requires this increased speed. If your rails are banking short, this method becomes quite challenging. (Video 16:52)
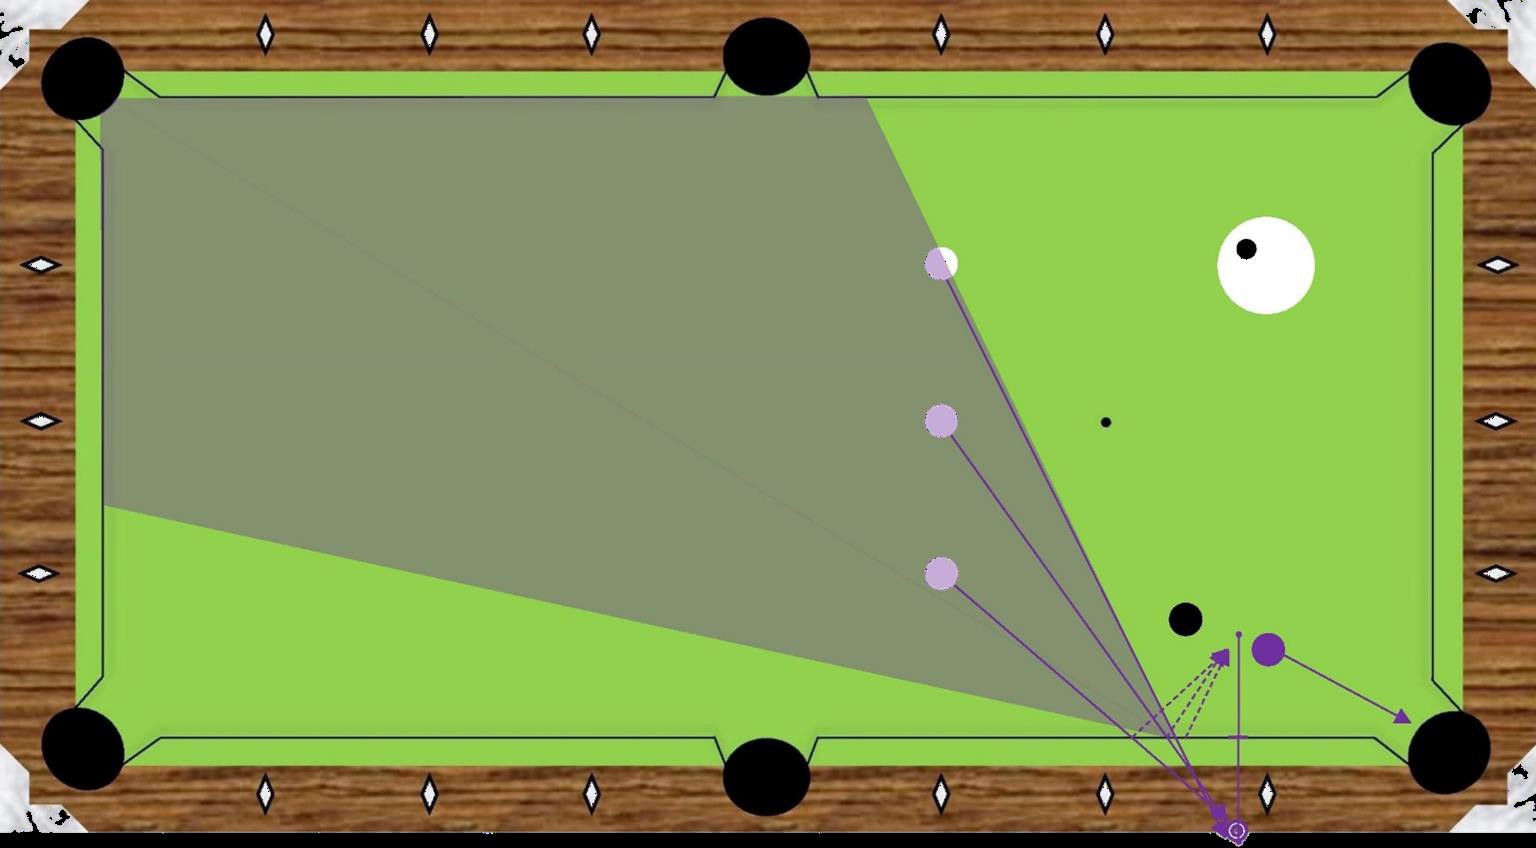
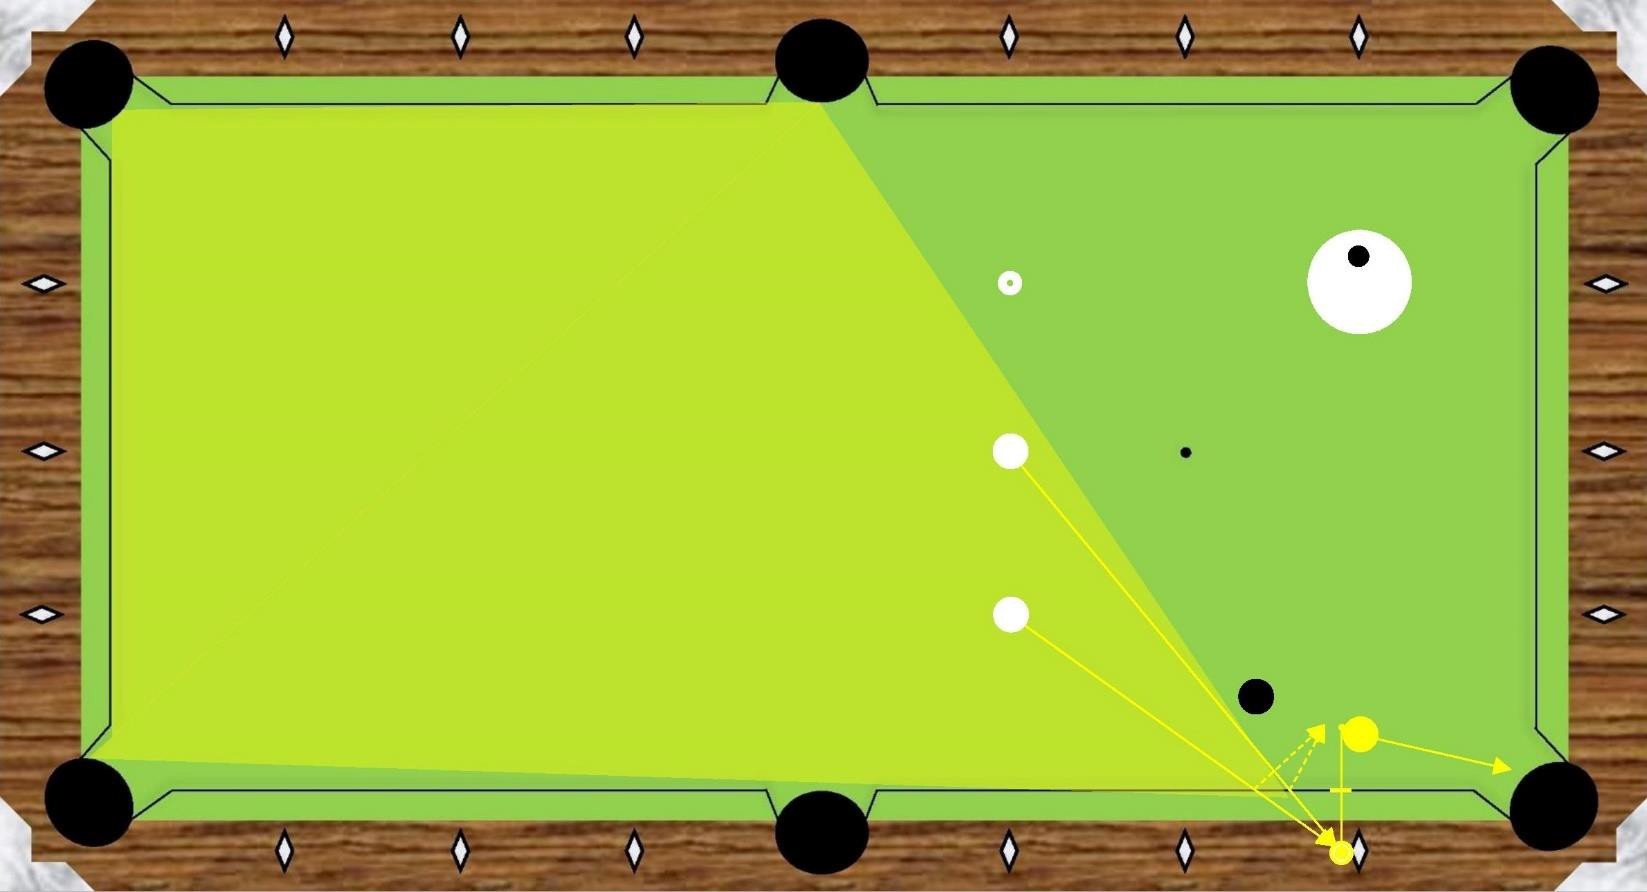
In this 4th, and final set (4 Ball), you will again be using the ghost ball as the target, and the object ball is two balls off the rail. In this case, utilize follow and spin (upper left in this example). The angle to the rail is incrementally steeper than with the object ball only one ball off the rail. As such, using follow & spin rather than just spin. Otherwise, you will hit the object ball too full, and send it into the short rail.
If comfortable using this method it will give a much larger effectiveness shade as compared to the third set. However, even still the cue ball position three, acutely steep, has a low percentage of success. As you can see the shade perimeter literally bisects the cue ball. This is the most difficult of the effective shots. As such, you will want to aim thin to the aiming point, and apply a bit more spin. Again, this will be very sensitive to the bank dynamics of the cushion & cloth. You may learn that the percentage of success for this shot is such, that it is more beneficial to play the shot safe.
Practicing the Rail First Shot Drill will provide you increased skill, and the knowledge to determine your ability to either be offensive or defensive. My preference is to is to use 1st set for the first cue ball position with the object ball one ball off the rail. For nearly all other shots I use ghost ball target method, excepting cue ball exit position requirements. (Video 18:46)
- RELATED ARTICLES
- What The F&#k Are You Looking At? (A Guide To Aiming) – By Jennifer Barretta
- Three Rail Kick System - Part One (Cue Ball Near the Rail) – By Mikey Verkruyse
- How To Make Kick and Bank Shots – By Florian Kohler