Introduction
Why do we need another aiming system? That’s often the kind of response I encounter when suggesting the Lucky Loser Composite Aiming System. However, I can often alleviate their concern by explaining that the ultimate goal is intuitive aiming. That is, aiming without using a system, and just aiming correctly naturally. Many suggest the way to get there is the HAMB; Hit A Million Balls. But, do you really want to hit a million balls to get there? That’s like trying to find a hidden location in the wilderness without a map. One of my favorite aiming systems is the Cue Ball Aiming System. It works like this: deliver the cue ball to the precise target on the object ball in order to achieve the desired result. It’s perfect, but also not too helpful for learning to aim either.
Aiming systems are not so much for game play, as they are for training. Upon examination, most of us find, that aiming systems have strengths and weaknesses. That is, particular shots where the system is very reliable, and outside that range the system breaks down. However, during game play if you recognize a shot from a system you have confidence in, obviously use it.
Then there is another factor that many do not consider or even know about, but experienced instructors and players do. That is, we each learn differently. Each of us utilize our sensory perception/s to varying degrees, and our learning modalities also vary. Some learn better by reading, others listening, visualizations, kinesthetically, etc… When assessing a shot some see lines, others channels, relative shapes, and distances. Each with a different value emphasized, and degree of resolution.
I considered these factors when designing the Lucky Loser Composite Aiming System. It is a synthesis of aiming systems which remove the weak aspects, and include the most reliable aspects. Additionally, there is some overlap on certain shots so that if the learning modality you prefer is a particular method, then you have a choice.
Finally, I went the extra mile, and designed training devices to compliment this composite aiming system. The first is the Lucky Loser Ball Fraction Aiming Device. Another is the Lucky Loser Composite Aiming Strip. The third is a ghost ball device. There are many ghost ball devices on the market. However, you can make a better one yourself. Simply, print out a small circle with an extended straight strip for aiming. Every ghost ball device I’ve seen on the market is just this, but with a short strip, rather than a long one. It’s very difficult to aim a short strip to a location for long shots. I’ll probably make and patent one soon. Be looking for these at PoolDawg.
Today I will be introducing to you my version of what is commonly known as edge of the shaft aiming. However, this version is called Sighted Ferrule Aiming. It was originally introduced to me in 1986 by my personal instructor Bill Brown. I was a porter at Saratoga Lanes in California, and one of my benefits was free pool table time. I was fortunate that there were five well maintained Gold Crowns there. It was during those years that I was able to formulate the Lucky Loser Composite Aiming System, and Sighted Ferrule Aiming was the predominant component.
Sighted Ferrule Aiming
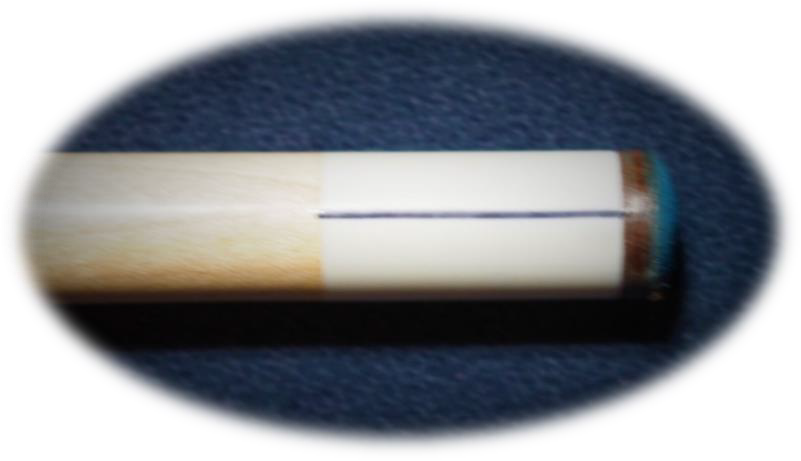
A sighted ferrule refers to a mark or line on the ferrule. I recommend a line, but a small dot or mark can be substituted to be discreet if desired. The line greatly reduces the visual estimation process of finding the center line. Without it, our subconscious incorporates other geometric aspects while aiming. To construct this simply use a straight edge and a pen to mark the ferrule. With today’s low deflection cues where on the ferrule you mark is not so important. When using other standard or sub-standard cues it does matter. When you roll those cues on a table you will often detect some warp in the shaft. Once the warp is determined roll the cues warp into the vertical plane, then draw the sighting onto its spline. In this way, you will at least reduce the horizontal error from the warp, which is more important in aiming than the vertical plane. (Video 0:45)
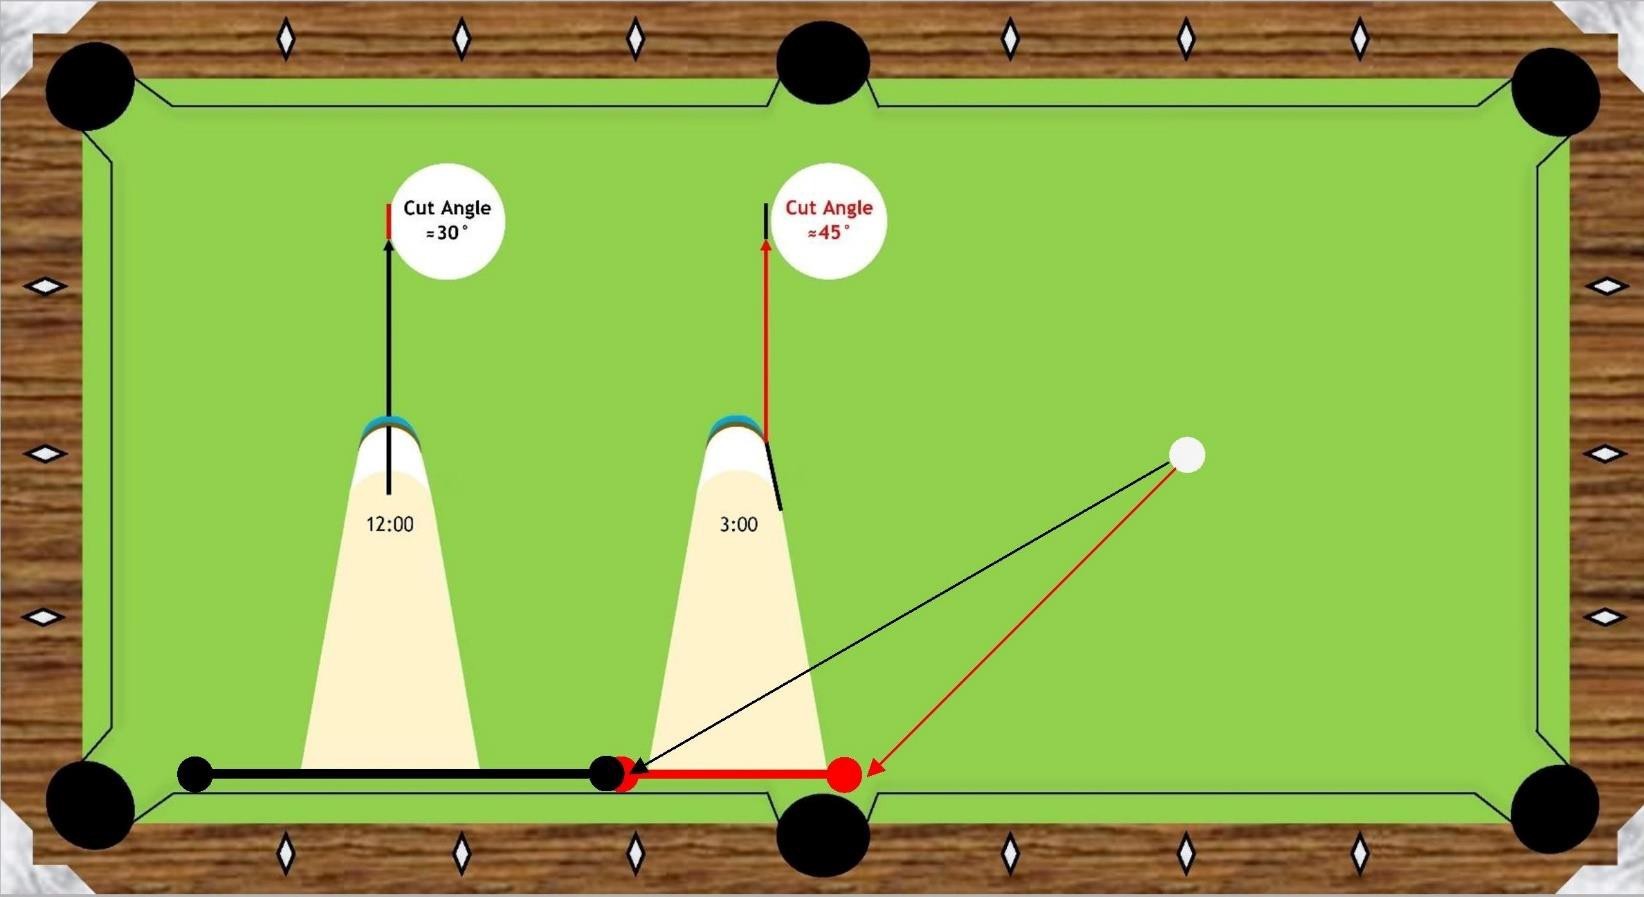
This system utilizes an imaginary clock face on the tip/ferrule. When the sighting is rotated into the topmost center position you can see it directly as you aim down the shaft. This is called the 12 o’clock position. If you rotate the sighting to the right 90 degrees the sighting will then reside at the 3 o’clock position, and if to the left the 9 o’clock position. Of those other systems some utilize rotations that reflect every 15 minutes on the imagined clock, and provide very precise control. If I were suggesting to use a system, rather than the ultimate goal of intuitive aiming, I would agree. However, since our goal is to not rely on a system as much as possible during game play, I submit only 5 positions on the clock are needed for training. From left to right these are: 9:00, 10:30, 12:00, 1:30, and 3:00.
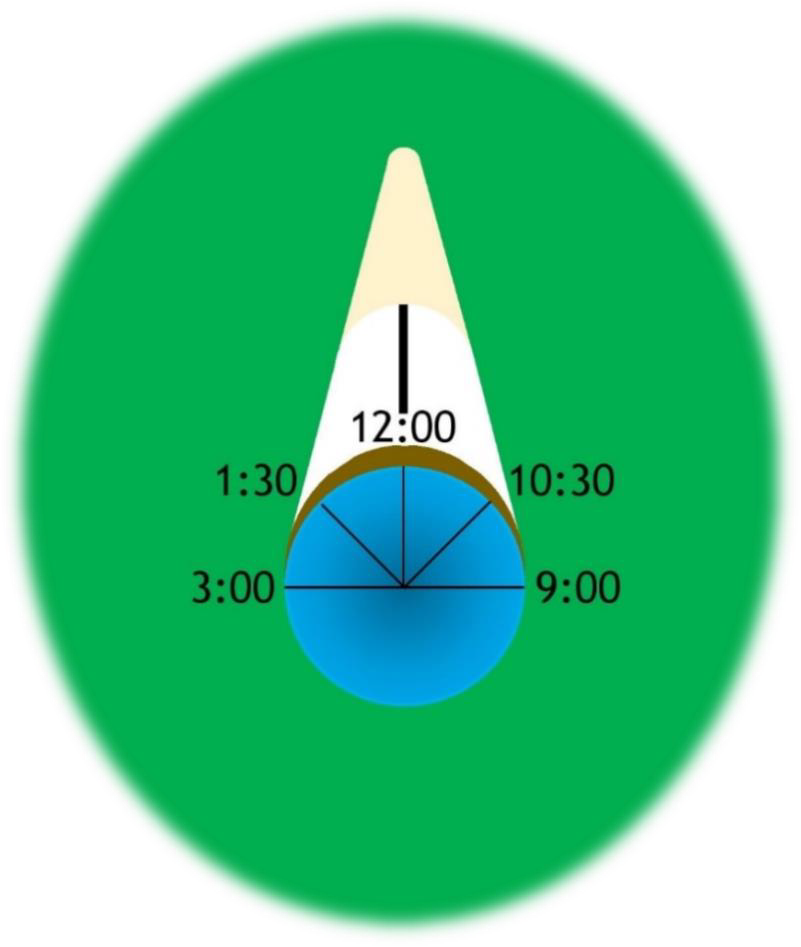
The system works by rotating the sighting into its clock location depending upon what range on the equator of the object ball the aim point is. Then using the sighting as the aim line to the aim point. These different positions compensate for the curvature of the balls. As such, when a cut is required, you can aim at the actual target spot (contact point) without having to estimate an adjustment for the third dimension of the balls. This is demonstrated in the exercise later in this article as well as in the video.
![]()
![]()
![]()
![]()
![]()
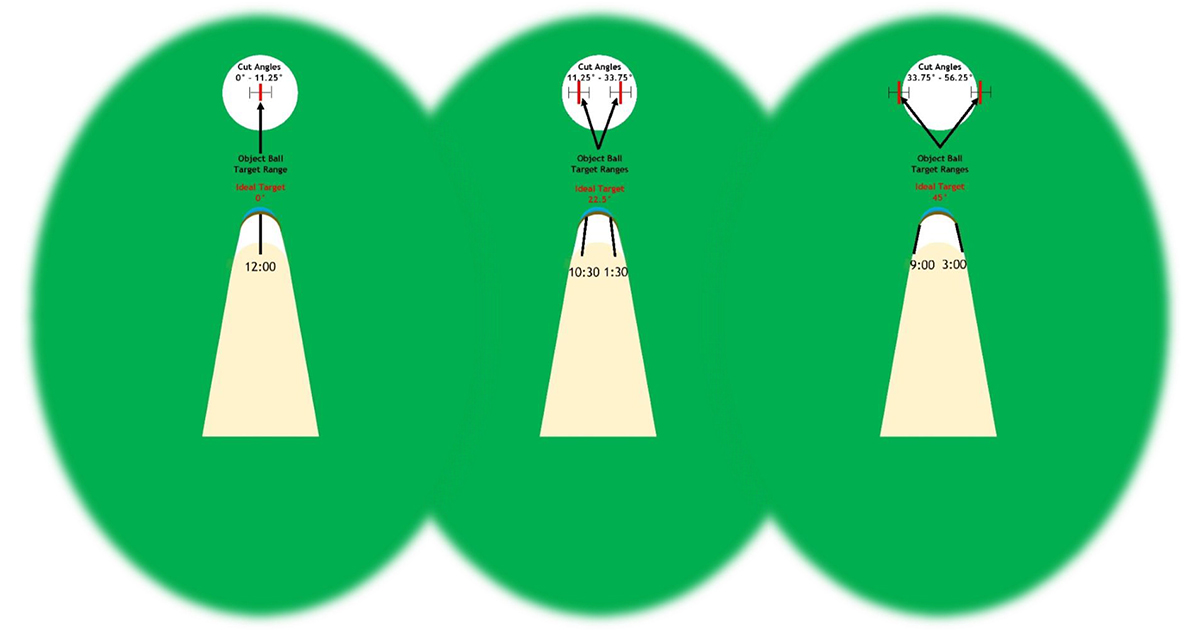
When using the 12:00 o’clock position the range of geometric cut shots is 0° to 11.25°. The 10:30 & 1:30 positions relate to the range 11.25° to 33.75°. Finally, the 3:00 & 9:00 positions related to the range 33.75° to 56.25°. A more easily accessible set is for anything less than 12° use the 12:00 sighting. For 12°-30° use the 10:30 or 1:30 sightings, and for 30° to 45° use the 9:00 or 3:00 sightings. (Video 8:44)
As suggested above, the position of the sighting on the ferrule compensates for the adjustment due to the curvature of the balls. As such, you will be aiming with the sighting on the opposite side of the ferrule than the side of the target on the object ball. In other words, for left hand cuts you will aim with either the 10:30 or 9:00 sightings. If doing right hand cuts aim with either the 1:30 or 3:00 sightings.
There are a few caveats. The system works with natural rolling, but I recommend using medium speed stun to reduce extra CIT from slow stun shots. As the angles increase to 45° the system breaks down. As such at the geometric 45° cut the sighting must be aimed near half ball depending on tip diameter. This design is for tips about 12.5-13.0 mm. Smaller sizes require adjustment. (Video 13:18)
One common question is “Do I aim with the sighting through the center of the cue ball?” The answer to that is “No”. The center of the cue, is always placed at the center of the cue ball unless using spin. Ideally, you will go down onto the shot aiming the selected sighting at the target spot, and the cue itself is at the center of the cue ball, unless using spin. This takes a bit of practice. When learning the system in the beginning go down aiming with the center of the cue through the center of the cue ball aiming at the target with the 12:00 sighting. From that position rotate the sighting into the desired position, and then switch your vision center over the selected sighting, and adjust the aim to the target i.e., contact point. If spin is to be applied you can make further adjustments. Again, ideally you do not want to be making any adjustments as you go down on a shot. Doing this with a sighting and spin requires a significant amount of practice. This is why many players opt for using a pivot point/length on their shaft to adjust for spin as an adjustment after going down on the shot. Everything in this exercise and drill is done without spin.
Calibration Exercise
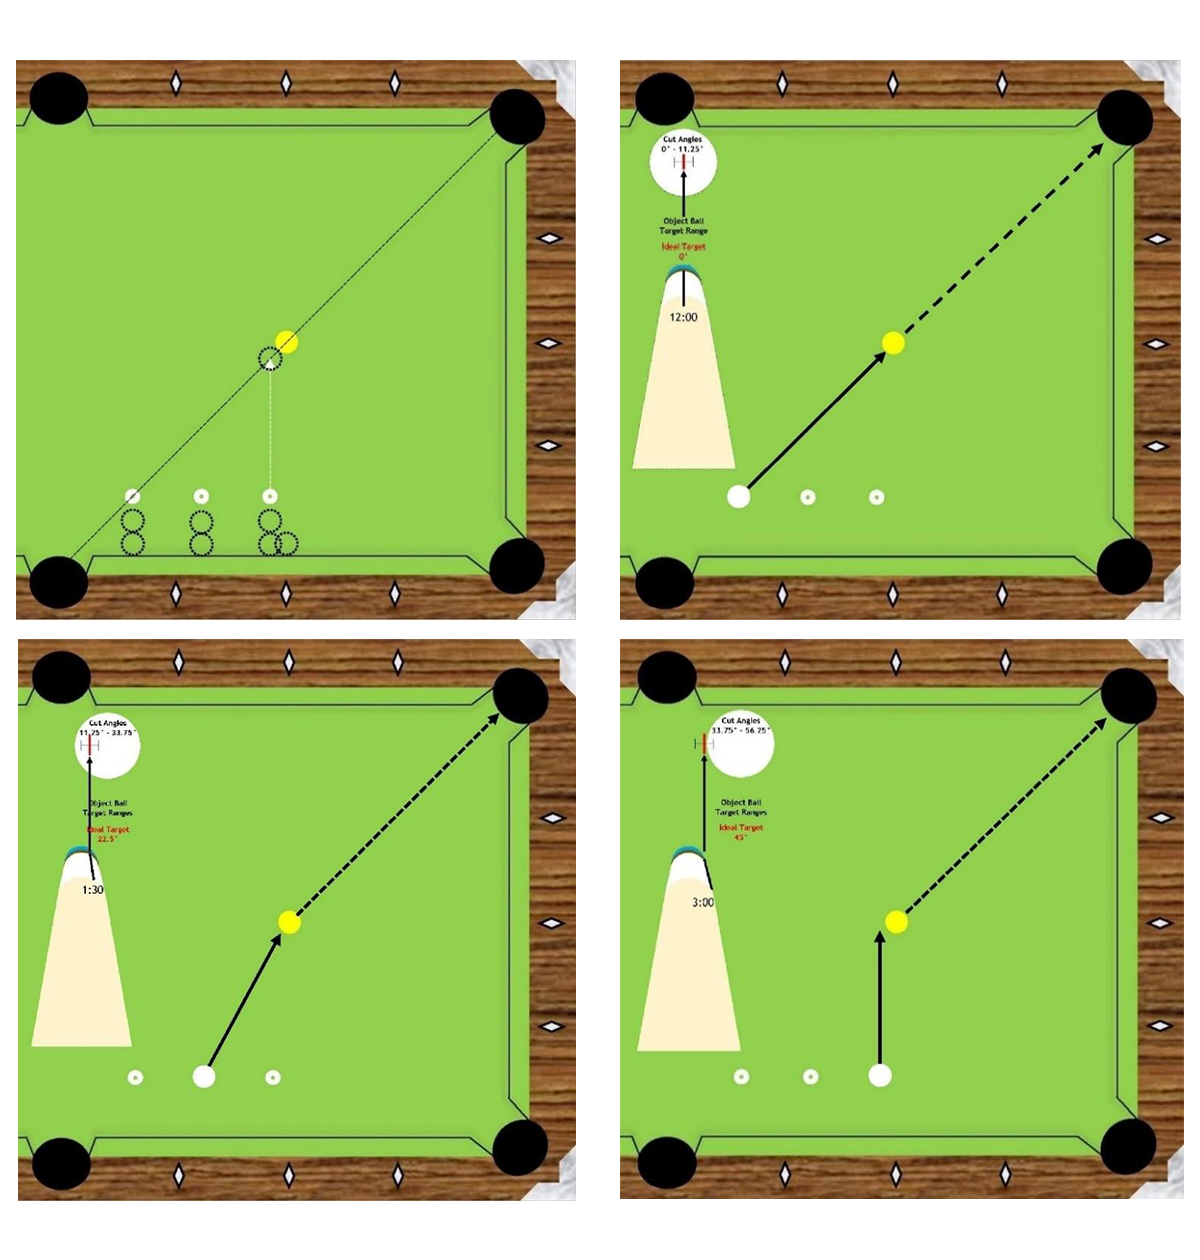
Place the 1 ball on the head spot with the number 1 as the aim point for the corner pocket. You will place 3 adhesive donuts 3 balls off of the long rail. The first donut is to be placed near the side pocket in a perfect straight line for the corner pocket through the head or foot spot. The second donut is to be placed ¾ ball from the second diamond. Measure the distance between the two donuts, and place the third donut at the midway point. Confirm set up with the illustrations below. For the first donut make the object ball using the 12 o’clock position. For the middle donut use either the 1:30 or 10:30 position depending if it is a left or right cut. For the final donut position use the 3:00 or 9:00 position, but no longer aim at the 1 on the ball. As we approach 45° cuts aim at a bit past half ball, again depending on tip diameter.
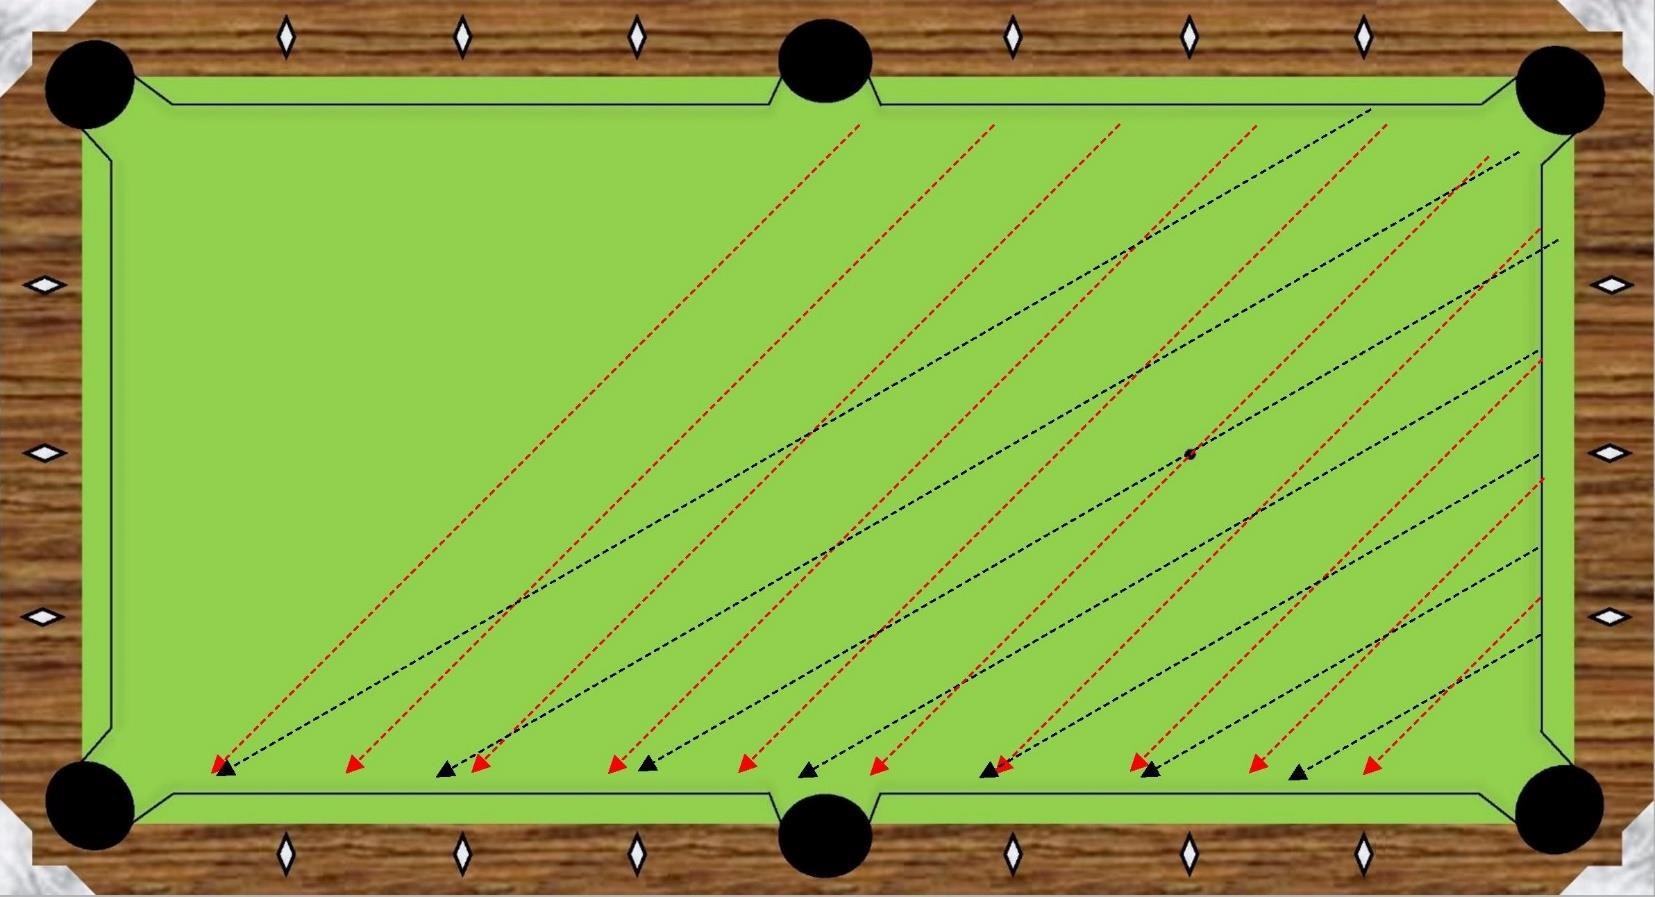
Rail Drill
In the drill below place an object ball at various points frozen along the rail, and begin with the cue ball on the head spot. If the object ball falls within the red range use the 3:00 sighting at a hair past half ball aim. If the object ball is in the black range use 12:00, and aim at half ball. This is more accurate than using the 1:30 sighting aimed at the contact point since this is at the very end of its range. This kind of overlap of aiming systems (Ball Fraction & Sight Ferrule) touches on upcoming articles related to the Lucky Loser Composite Aiming System. On the other rail, for left cuts, use 9:00 and 12:00. (Video 16:06)
The lexicon of pool has a number of words and sayings. For cutting there are two words that apply here: thick and thin. Thick is aiming to hit slightly more of the object ball, and thin means to hit slightly less. Slightly more or less means millimeters. As the angle decreases aim thick, and as the angle increases aim thin. For example, if the ball is off the rail you will want to aim thicker. Determining exactly how thick or thin comes with practice, and how much you can cheat the pocket. (Video 24:00)
Afterwards begin experimenting with the object balls off the rail. At first, half a ball off the rail, and then one ball off the rail. Practicing this you should learn your thin and thick adjustments relatively quickly, and develop an intuitive sense of whether an angle is about 30⁰ or 45⁰.
Once developed you can take this into a wider range of cue ball positions for rail shots. Below is an example grid of 30⁰ and 45⁰ rail angles across a table. Give these some practice, and soon your rail shots will become bullet proof.
- RELATED ARTICLES
- What The F&#k Are You Looking At? (A Guide To Aiming) – By Jennifer Barretta
- Three Rail Kick System - Part One (Cue Ball Near the Rail) – By Mikey Verkruyse
- How To Make Kick and Bank Shots – By Florian Kohler
2 Comments