The Power of the Stop Shot (Part 2 of 2)
In Part 1 of this two-part series, we defined the stop shot and all its wonderful benefits. You learned to use the stop shot to calibrate your stroke, stop the cue ball, and control the slide in the early stages of position play. I promised you that once you were able to execute the stop shot from any distance at any speed, then you would always be able to predict which direction the cue ball is going. By now, I’m assuming you’ve had the opportunity to shoot hundreds, maybe thousands of stop shots. Have you mastered it yet? Are you able to consistently get that cue ball to slide and stop at the point of contact? If you’ve grasped the concept of a sliding cue ball, then you’re ready for part 2.
In this lesson, we will use the same speed and tip position that we learned to execute a stop shot, to cut shots (or stun shots). Before, when the shot was lined up straight in, the cue ball had nothing to do but to stop. It transferred 100% of its energy into the object ball. Now, if you apply that same speed and tip position to cause a sliding ball at the point of contact, you can predict which direction the cue ball will be traveling.
The Perpendicular Cue Ball Path
A basic rule of thumb is when the cue ball is sliding at the point of contact with the object ball, you can trust it will travel at an imaginary perpendicular line from the line of which the object ball is moving.

This diagram illustrates the direction the cue ball slides when it contacts the object ball. Obviously, the more extreme the cut angle, the less energy the cue ball transfers to the object ball. Therefore, the cue ball will come off at a greater speed. To keep the cue ball on the perpendicular line while controlling the speed, the same theory applies that we used with the stop shot.
To achieve the same results, LOWER SPEED = LOWER TIP POSITION.
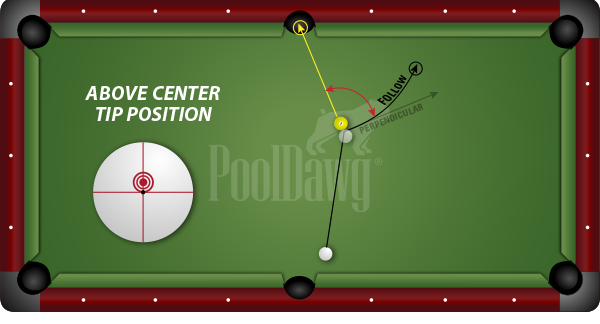
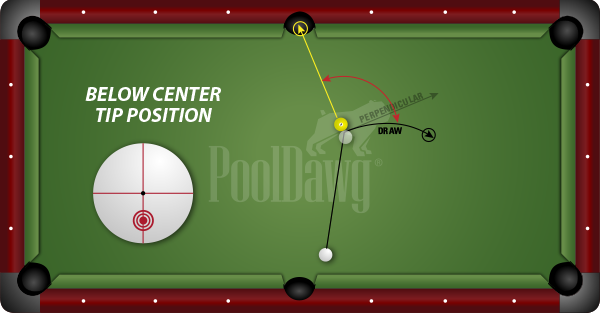
All position play begins with understanding the slide zone. When you know which direction the neutral cue ball is going, you can manipulate that line simply by aiming higher or lower. Aiming above center causes a rolling cue ball (otherwise known as a follow shot) and moves the line forward, above perpendicular. Aiming lower to cause backspin brings the cue ball backward (otherwise known as a draw shot) below the perpendicular line.
When you’re able to control the rock, not only does it mean you can play better position for your next shot, but think how handy it will be when you need to avoid a scratch or break out of a group of balls. These fine points are what keep players from finishing a run out.
 Frank Says: "The Tangent Line Finder is a great training tool to help someone who is new to the game visualize where the cue ball will go after contacting the object ball!"
Things to Consider for Stun Shots
- How clean are the balls? If the balls are dirty, they will act as gears upon contact and cling together for a fraction of time before the cue ball slides on the perpendicular line. Likewise, if the balls are newly washed, they can become much more responsive. If the balls were just cleaned, you may want to aim a little higher than you would think or bring your speed down.
- How worn is the cloth? Slippery, new cloth will also make a surprising difference. When a table is freshly recovered, the cue ball tends to slide in place, even though it may be rolling. Therefore, this will shift the slide window. You’ll need to bring your speed down to achieve the desired results.
- Is the cue ball actually sliding at the point of contact? Playing with the Aramith Pro Cup Measles Ball helps you see exactly where the cue ball is sliding at various speeds and distances. You can also easily identify if you’ve inadvertently hit too high or low based on the cue ball’s response after it contacts the object ball.
- Did you cheat the pocket? Object balls can still go in even if they don’t enter the center of the pocket. Whichever side of the pocket the object ball enters will shift the perpendicular line of the cue ball. This can be used to your advantage when you need to create more or less angle, but always be specific with exactly where you intend to pocket the ball. Understanding how to adjust your speed and tip position to manipulate the slide zone will help you predict the path of the cue ball.
The next time you’re in the mile high area and looking for a Denver billiard instructor, be sure to look me up!