Hi, my name is Florian Kohler, also known as Venom, and today we're going to talk about breaking and racking strategies. We're going to cover 8-ball, 9-ball, and 10-ball, how to break, how to rack, and how to analyze the rack for the best breaking results.

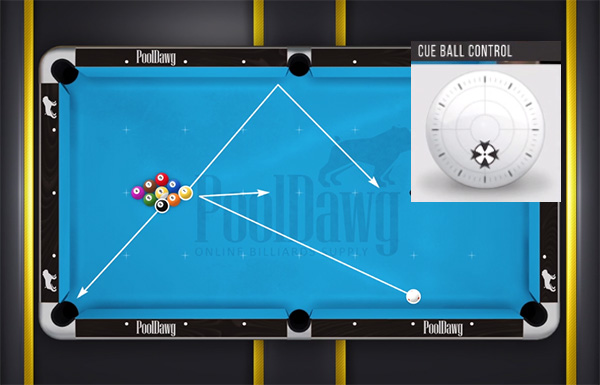
This first break is probably the most common one; it is the one we use in every tournament because, in my opinion, it’s the one you can control the most. I'm going to break into the thirteen from left of the head spot, and I'm going to try to make the 14 out there or the five there (in the side pockets). It sort of depends where you put your cue ball. I like to put my cue ball there, a little to the right of the spot, so usually the second ball on the opposite side (14 ball here) has more of a chance to go than the 5 but will depend on which side of the table you break from.
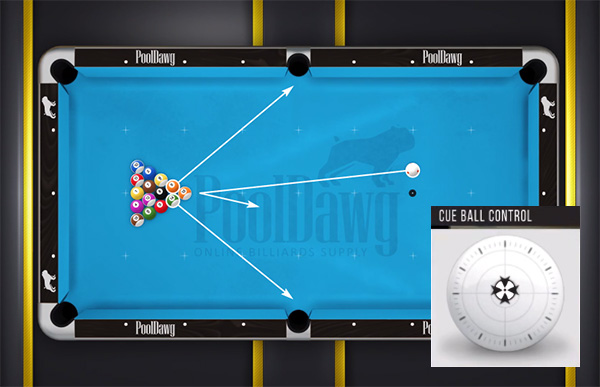
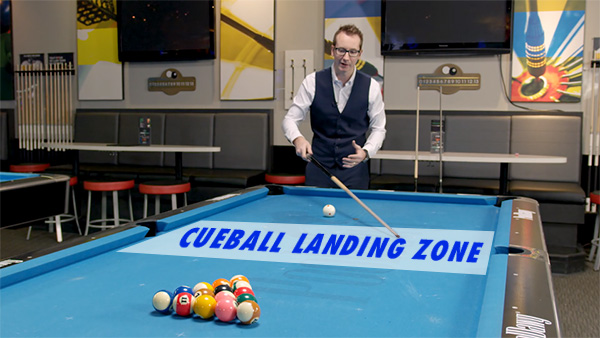
So once you get that, you're going to have to put your cue ball a little bit to the side of center. I go a ball and a half away - something like that. You should use top, so the ball kind of jumps after impact and either hit this rail here and comes back, or goes straight back in the air and kind of stops in the middle. You always want to have your cue ball land in the middle of the table to give you the best chance to make your next shot.
I'm just going to try to make that second row ball here, so either the 14 on the left or the 5 on the right side pocket.
There you go! The balls are not always going to go exactly where you want. But in this case, I made the 14 exactly where I wanted it to go.

We have the cue ball somewhere in the middle of table. It probably got kicked at some points; it would have been better closer to the middle. It's still acceptable. There is so much contact between the balls in 8 Ball, it's pretty random. You can announce a lot of shots: four rails, two rails, but really in my opinion, the only ones you have to look at are the most important balls - the first three. If you can control those and your cue ball, you're in great shape to run out.
8 BALL 2nd BALL BREAK - Breaking from the Side to Make the Wing Ball
Here's another way to break in 8 ball. This time I'm going to break towards the second ball, which is the 2 ball. I'm going to actually put the cue ball pretty far on the left side. Usually I try to go as close to the rail as possible. Of course, you can break from the other side, but I like to break from the left side. The idea is to shoot into the second ball (two ball) with bottom and a little left to get the cue ball back to the center.

We're going to try to make the wing ball here (corner pocket), which is the 11 here. So the draw is going to help you push it because right now, it's not lined up. So we're going to try to push this ball and force it here.

And the problem with that break, to me, is that it leaves a lot of clusters. Because you break from the side, you are going to move the balls back and forth across the table and usually land on one side of the table. This could be good against some player who runs out a lot, but they're not so tactical. If you like defensive shots, it’s probably a great break for you.
If you like more space kind of like me, I’d rather break from the first ball. I'm going to demonstrate this break anyway, because I think it's great to have every possibility shot in your arsenal.

There we go. And that's how you break from the second ball. As you can see, there's a little more clusters here. It kind of worked out pretty good in this case. But the problem I had with it is that you kind of lose control of the cue ball. You don't really know where it's going to go. So anyway, that's one way to break and like I said, it works pretty good well against some opponents.
How to Make the 8-Ball on the Break to Win the Game!
In this case, we're still breaking from the side of the table into the second ball. But instead of trying to make just the wing ball and kind of try to play a defensive rack, we're going to try to make the eight ball.

Now the thing is if every ball is frozen to each other you're not going to be able to do it. There will be a lot of kisses and you’ll need a lot of luck. However, if there's a gap, in this case the opposite side of the cue ball, which is right here in between the 13 and 8, you are going to be able to make the eight ball in that side pocket.

Now the gap can’t be too big and it can’t be too small. It needs to be large enough to allow movement but small enough not to make a dead rack.. But again, you think about all those pros when they're looking at the rack like this, and going over and trying to find the gaps.
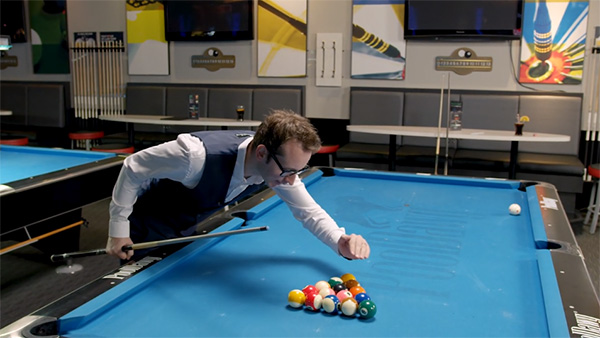
It's not just a legend and it's not to intimidate the opponent. It’s actually purposeful and it's very useful for you to be able to analyze and see where there are gaps you can take advantage of.

In this case I'm just going to go ahead and break from the side into the seven. Try to make the eight right there.
There you go!
And that's how you make the eight ball on the break by watching the gaps. So remember. It's not a legend when people go look. Especially pros, when they look there at the gaps there's a reason for it and this is a perfect example. You can win the game first shot and that's just knowledge.
 Frank Says: "Joe Tucker literally wrote the book on Pool Racking Secrets. We have the DVD though… Check it out if you want to learn more awesome Billiard Racking Secrets that will help you win games."
9 BALL BREAKING - Pocketing the Wing Ball and Positioning to Run Out

We're now playing nine ball. So the one is on top and the 9 is in the middle right there. I like to break from the left side, pretty close to the rail out there. And the idea here is to make the “wing ball”, which is the eight ball on this rack. Now as you can see the eight ball is not quite lined up. So the idea behind it is to try to move that tangent, to move it into that corner pocket here. To do that I'm going to use a lot of bottom on the cue ball.
Now, to do so, you're going to send your cue ball into the one, and it is going to go either here, in the center of the table, or even go one rail back to center. That's sort of a typical way to play position. Always remember that keeping the cue ball in the middle of the table gives you better odds to make the next ball.
The next thing you can control in nine ball is the one ball because you're going to hit on that side. That one ball is going to have a tendency to go here. And if it doesn't go in the pocket, it usually goes back towards the break side of the table. So you can actually track it. You can track that one ball and that cue ball so you leave yourself an easier shot right off the break. So I'm going to try to show you that now.
Okay, so eight in the corner. Position with the cue ball and the one ball.

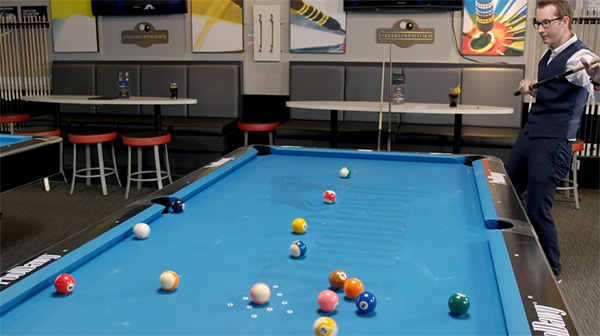
Okay. So as you can see, I didn't really get lucky but I did get a really good break. My one ball was tracking towards there and my cue ball was going to be here, which would have been my exact plan. However, I got a little kiss but ended up being still a perfect shot. I mean, this is pretty much as easy as it gets. It’s almost a perfectly set up table to run out.

As we saw in 8 ball, gaps can make a significant difference, so in 9 ball it’s really important. So we're going to look at the gaps into the 1 and the 5, the 5 and the 8, the 8 and the 6. So that's providing that everything else here is tight. So whenever you hit a rack, usually, the same energy goes to both sides. However, if there are gaps, this is going to slow the transfer of energy, meaning the wing ball (8 ball) is going to go lower down table.
So if you have a hard time making the wing ball and it's always coming up high, gaps in the rack are going to really help you because it’s now naturally is going to go towards the corner rather than too high.
Now in reverse, if you’re already making the wing ball (8 ball) really well in the corner and see some gaps, you might want to switch back to the other side because if the gaps are there, you are probably going to hit it too low. So again, you have to always use the gaps to your advantage and if you have a chance, always go look at the rack and kind of figure out what's the best option for you.

One more thing. The bigger the gaps are the lower the wing ball is going to go. So naturally to compensate, you can have to move your cue ball towards the center of the table, rather than the side. That's how you make the wing ball even if there are gaps in the rack.
Pattern Racking for 9 Ball to Maximize Your Chances of Running Out
Let's now talk about pattern racking. So I know it's frowned upon for some tournaments and a lot of tournaments actually, have you put the two ball in a certain spot. However, in my opinion, if you're a good player you have to know what it is about. There are tournaments where it’s rack your own with any order, so you really need to know the rules. This is common knowledge that you have to identify either to play to your best, or to identify if your opponent is, you know, putting on yourself.
Pattern racking is putting the balls in a certain order to maximize your chances of running out. In this case here, we basically play to “zones”. I'm going to play the high zone, the middle zone, and the low zone. The low zone is where the nine ball is going to be, high zone is where the one ball is going to be, and then the middle balls are probably going to be somewhere in between there.
So if you look at the rack quickly here, we're gonna start with the one ball. So the one ball we know goes towards here. Breaking from that side goes here, either goes in the pocket, or goes somewhere on this side of the table.

Now, let's look at the two ball. Two ball, same thing. Goes somewhere there, and then back there. So these two balls are already going to be on this half of the table, which is the high zone of the table.
Now the five ball, if you look at it, it's natural tendency would be to go towards the middle zone here. One rail here. Of course a lot of kick happens, so the five ball can move somewhere else. The 8 ball is already taken care of, that's the wing ball always going there. The three ball is going three rails: long, short, long, towards there. So that takes care of one, two, three, into the high zone of the table. And if you make the one you still have two and the three. So that's very important, as those are probably the most important balls.

Now, we're going to talk about those two. Obviously the nine ball, if racked well, it is going to stay where it’s at. Six and seven are probably the balls that are going to move the least. So you want to leave them down there because it's the low zone. You want to have the seven in the six closer to your 9-ball. So whenever you're at the end of the rack, you don't have to go back and forth, and simply just do a stop shot then stop shot, and then the 9 ball.
In my opinion, the biggest one that's a little complicated to predict is the four ball because that 4 ball is going to go towards the short rail here, and goes back to usually up table. The thing is however, there's a lot of kisses and stuff. So that four ball has got a lot of chances to be kissed somewhere here, there, or there.

However, because you already have the one, two, and three in the high zone, even if you have to go down for the four, you know, it's not that bad of a deal and if you're lucky the four is going to come somewhere pretty high too and stay in the middle table. And that's how you get the perfect pattern. So again, perfect pattern: one, two, three here, four and five there, six, seven and nine ball towards there. Eight ball in the wing. And that's how you maximize your chance to run out.

Okay, so it didn't work as good as we expected. However, we really have the low balls down at this side of the table, and the high balls on the other side of the table. So it's sort of what the best part of racking could be like. This is an easy out; you know two is there, three is there, four is there, five is there, and then all you need do is go down table, six in the middle, seven there, and nine at the bottom table. As good as you're gonna get.
How to Break a Rack When Playing 10-Ball
For this last part, we're going to talk about the 10 ball break. The 10 ball break is pretty simple. We’re gonna have the cue ball toward the center, try to shoot into the one ball pretty full and try to make either the two or the three there in the side pocket. The idea is because those balls are naturally coming short, you're gonna have to move more towards the center to bring them long to try to make them in the side pockets.


The next thing in the 10 ball break, is you have to give a little stick angle every time, to try to get that cue ball to pop up after the one ball impact, so the balls can go under. The cue ball sort of jumps and stays somewhere in the middle of the table to give you the best chance for the next shot. So let's try this and let's try to make either the three or the two ball there.

And there you go. That's a solid 10 ball break. I made the two ball in the side pocket. I got a shot on the one and my cue ball sort of jumped and stayed in the middle of the table. Can't ask for much more.
Pattern Racking for 10 Ball to Maximize Your Chances of Running Out
Let's talk about the 10 ball pattern rack now. So this is what I call the offensive situation here. So obviously, one on the top and ten in the middle. I like to put the four and five in the second row, but you can also alternate between two and three. In this case we're going to try to make either four or five there. The 9 and 8 have a tendency to stay at the bottom half of this table. The 10 is obviously going to stay down.

Now those are pretty predictable. Usually they go one rail bank here into that half of the table, the first half here. And then 6 and 7, they have a tendency to go four rail bank all around the table and go back into the second half of the table. So ideally, you're going to get one, you know, 2 and 3 here, 4 and 5 either in there or sort of land there, and then the other high balls are going to stay in this side of the table. And that's pretty much to me the best pattern rack you can do as far as running out for 10 ball. So let's see what we can get here and let's see if this works.

There you go. There you got it. Nearly the perfect 10 ball break. The one stayed low, the two stayed low, the four sort of the middle table, and then the bottom was six, seven, and eight towards this side of the table. So close to the 10 ball.
You really can't do much better. To me this is the best offensive pattern racking that you can do in ten ball. Now again, remember every table plays a little different, so it's not uncommon that you got to switch some balls to get a little bit of a different reaction.
That was 8-ball, 9-ball and 10-ball breaking and racking secrets. I hope you guys enjoyed it.
I want to thank PoolDawg for making that happen. For all your pool and billiard supplies, please check out pooldawg.com. The link is in description and see you guys!
- RELATED ARTICLES
- Choosing the Right Break Cue – By Mikey V
- Breaking Bad – By Jennifer Barretta
- 5 Tips For a Highly Effective Break – By Samm Diep
1 Comment