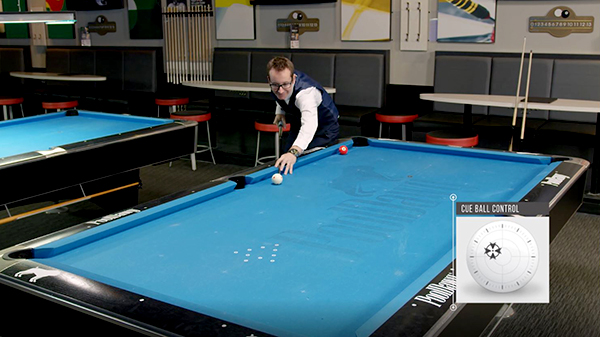
Hi, I'm Florian "Venom" Kohler and today I want to tell you about two-rail kicking systems.
The two-rail kicking system is actually safer and more efficient than one rail, simply because it's more accurate and more precise. We're going to cover two methods: one with “no math” and one with “math”. Both ways, are going to take the guesswork out of the equation and really help you out to get out of those crazy safety situations.
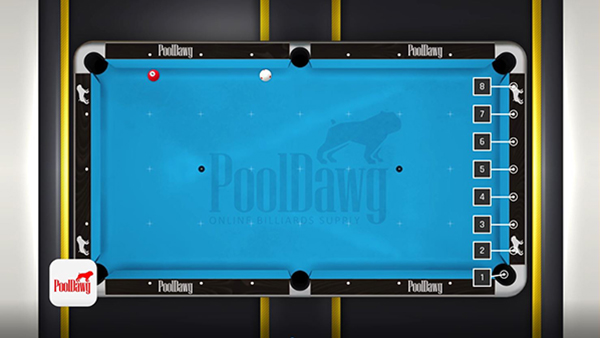
Quick consideration before we go any further, we have to talk about running English. Running English is absolutely needed when you go two, three or even more rails. In this case, let's take this as an example. We have the three ball here, and the cue ball there. We're going to try to kick the ball two rails, so short, then long, into the three ball here.
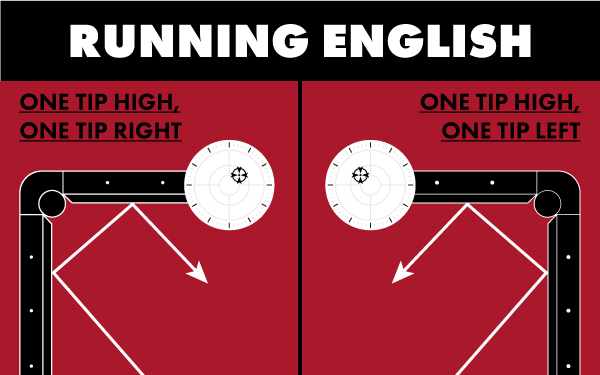
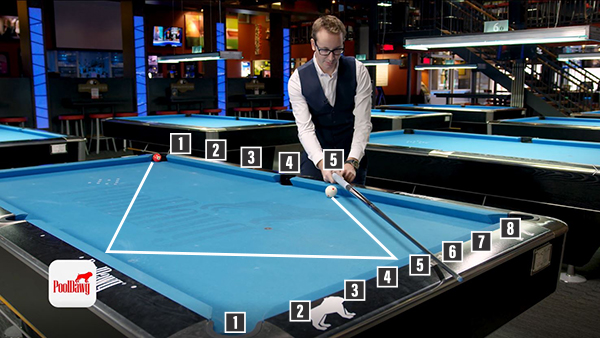
Obviously we're going on the left side, so I'm going to use left English, simply because it follows the natural path of the cue ball. Again, this is really needed to help you make these systems work and to draw the natural angle of the table. If you put anything less than left, it would actually work against you, slow the cue ball down, or go a different path. Just keep that in mind when we're using the systems. Without the proper running English, it will not work.
Two-Rail Kicking System: Using the Midpoint and Parallel Shift
The” no-math” system is a very versatile system. It works great anywhere on the table. So even if the balls are like this, like this, I really like it. It's not super precise, but you going to have a really good chance of touching the ball. Now, before we go any further, let's look at the crosses on the table. We marked each diamond's intersection here, so basically the distance in between each cross is going to be the same.
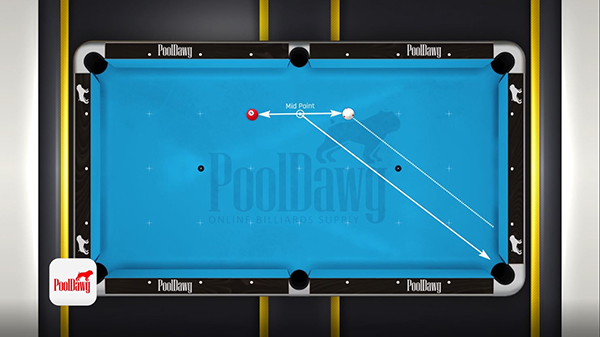
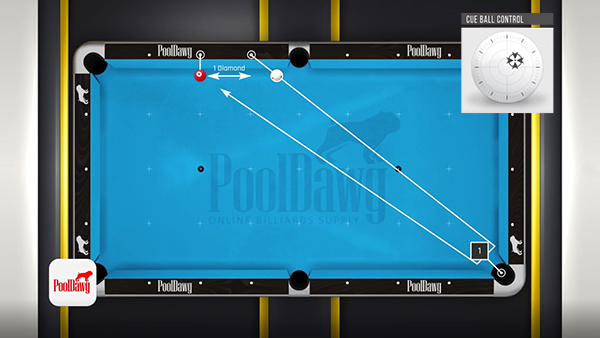
Let me explain the system. Let's start by putting the three ball right here on this cross and the cue ball right here in this diamond intersection. As you can see there's a cross right here, which is basically the same distance from the three to the cross, and the cross to the cue ball. We're going to put the butt of the cue right here in line with the midpoint, and point into the pocket right there. Once you found that, all you need to do is parallel shift like this, and you have your aiming spot on the short rail. Usually we use running English. This one we're going to use a little more than running English, but not too much. Again, we are aiming somewhere by the ear of the dog. I am shooting short rail, long rail into the three ball and that should be right there.
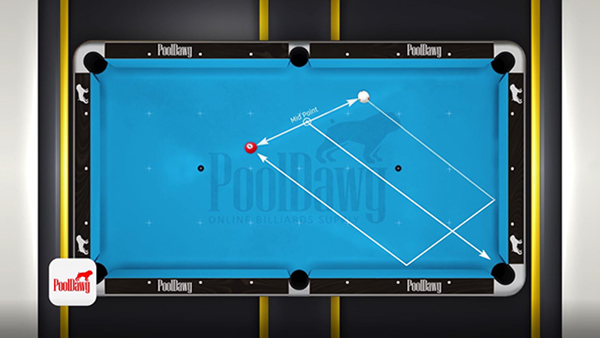
As you can see this was pretty obvious, and pretty easy, but we're going to make it a little harder. Let's move the three ball here and the cue ball there. Now in this case, we don't have really the crosses to help us. What I'm going to do is I'm going to take the distance between the cue ball and the three right here, try to find the middle, which is probably something here. Of course, it's not a hundred percent accurate, but you can try your best. Aim to the center of the pocket, right there, and then use the parallel shift. So we're about one and a half diamonds, maybe a tad more. Using a little bit more than running English and we should be right on it. There we go. As you can see, we touched the ball twice. To me, it looks pretty controllable, and you actually have a good chance to hit it, and you have a better chance to hit this shot two rail than if you're one rail.
Two-Rail Kicking System: Estimating Aim using the “Diamond Distance” and Numbered Positions
While the first one is very versatile and works all great around the table, this one works really well when you're close to the rail here.
We're going to start with this situation here, and we're going to start counting from out there at the pocket. This is what you need to remember, the numbers are the system. The corner out there is one, have diamond two, diamond three. Then it's four, five, six, seven, eight, and technically nine, but we really don’t need to go out there.
Now the next thing you're going to do is look at the three ball. The three ball is along the rail here. There's one distance here, that's about a diamond and another diamond distance there, so that's a two-diamond distance. Think about the quantity, not a diamond number. From here, I'm going to go to two, so two-distance diamond into the number two out there, which is that one, if you remembered correctly. Think about it- It's through the rail, not on top of it. If I'm talking about a diamond here, it's not exactly here, but through here. Think about the cue ball going through the diamond. Again, so I'm going to look here into the number two and what I look now is my cue ball. So my cue ball is right under the center. From here, all I need to do is aim at the “two” with running English. It goes short trail, long rail and into the three ball. There you go. As you can see, this is a very accurate method.
Let's keep going. Let's do right here. Now let's move our cue ball right here. We have the three ball here, there's about a diamond distance. I'm going to try and see if I go from this diamond to the one, my cue ball is right there. Now, obviously the one doesn't exist because it's in the pocket so all you can do is get as close as possible and add touch of running English, and that should do the trick. There you go.
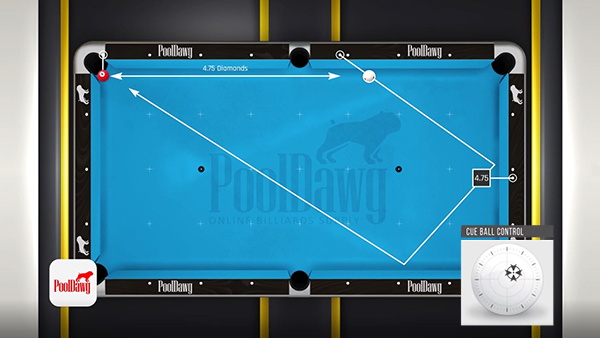
Now we’ll keep going here. Maybe we put the three ball lower and maybe we put the cue ball higher. This is when it gets interesting. We still have a diamond distance here at least, we have at least two diamonds, we have at least three diamonds, at least four diamonds, maybe five, but I'm not so sure. So we're going to start here. Now that's when you need to find the perfect spot for your cue ball. We're going to start with four. Remember one, two, three, and four. I go from the diamond here to the four. My cue ball is not under the cue so that is not four. Let's try five, five to five. My cue ball is not under the cue, either. That means it's not four, it's not five.
Now the real question: is it closer to four or closer to five? It's obviously closer to five. So all I'm going to do here is I'm going to try to do instead of 4.5, I'm going to go for 4.75. So right here, and that should do the trick. Again, just running English, but because you're a little higher to the table, just use a touch less English. Let's see what happen there. There you go. Foolproof system, and we made contact three times in a row. The real trick here is to understand how to set up the ball under the cue.
While the system works really well when the cue ball is closer to the rail, it's easy to identify which number you need to use. When the cue ball off the rail, something like this, it becomes a little more difficult. So we're going to try to figure it out this way. We know here there's at least one diamond between the three and the cue ball. We know that. We kind of guessed it so I'm going to draw a line, one-to-one. The cue ball is not in there. Let's do two diamonds, and try to figure out. Two, two, two, Look at that. The cue ball is practically perfectly under the two. That means in this case what we got to do is pretend the cue ball is here and just aim for the two. Two is running English and should work just fine. There we go.
That’ is it for the two-rail systems. Remember; use them to your advantage! The first one is very versatile, works really good when you're off the rail. The second one is really accurate when you’re close to the rail. So always try to use the best one in the best case.
As usual, any question, please comment below, let us know what you think about it. For all your pool and billiards supplies, please go check out pooldawg.com, link in the description. See you for the next lesson, guys.
- RELATED ARTICLES
- One-Rail Kicking & Banking Systems – By Florian Kohler
- Four Hook Banking System – By Mark Finkelstein
- Amazing Two Rail Kicking System – By Mikey Verkruyse