The bridge. What can I say about the bridge? I'm not talking about the splay fingered loop one that you sometimes practice as you're in a meeting with your boss. Or the elegant standing bridge with your pinky and first finger pressed deeply into the cloth. Or even the rail bridge where the cue runs tightly yet effortlessly along your thumb as your index finger wraps the whole thing into a neat little package. I'm talking about the mechanical bridge. You know the one that you fumble under the table for when the cue ball is juuuust out of reach.
Snooker players live and die by the mechanical bridge and they are well trained in the art of using one. My mentor wouldn't allow me to use any other method to make balls that I couldn't reach until I mastered using the bridge, so that's what I did. I studied how snooker players approached their shots, put in some practice, and now I consider myself a master of mechanical bridging. Let me share my observations with you.
1. First, with bridge in hand, align the shot like any other. Stand behind the line of aim and lay the bridge across the table. After I put the bridge head up to the cue ball, I like to move the back of the bridge out of the way, holding it down with my opposite hand.
2. Second, lay your cue in the groove that gives you the appropriate height. For follow, the highest; for stun, the middle; and for draw, I actually prefer the middle with some downward cue angle. For power draw? Play around with the highest groove and lots of downward angle.
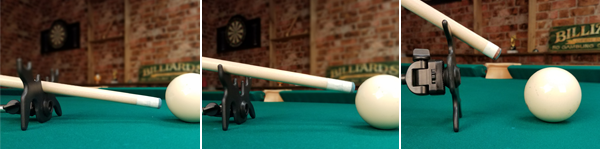
3. Third, keep your head about a foot behind the bumper of your cue, looking down the line of the cue with your dominant eye. That foot of space allows you to take warmup strokes without punching yourself in the face.
4. Fourth, and this is where I see most people go wrong, get your grip right. As you look down your cue, your four fingers should be on top of the cue and your thumb will be underneath. If you don't know what I mean, it's basically the same way you position your hand as you drink from a bottle of water.
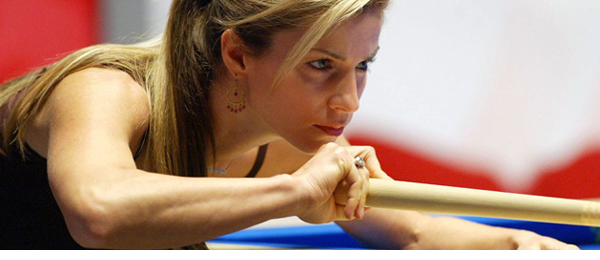
5. Fifth, get your elbow up to where your forearm is, about a 45 degree angle. There should be no break in your wrist. This will make your arm stable and allow you to take straight practice strokes.
6. Last, follow through! You can do just about anything with a mechanical bridge that you can do with a finger bridge. In fact, it should be easier because you have a much better view and less moving parts!
 Frank Says: "If you find yourself using the bridge often, then you’re going to want to try out the professional caliber Justa-Bridge. Another great, easy-to-use option is the Shifty Bridge! Both of these are legal in APA and other major leagues"

Hopefully, with some practice, you too will be a bridge ninja. As you make your way around the pool circuit, you will learn the subtle differences between the basic plastic bridge (standard pool room),the moose head (hey, nice poolroom), the x bridge (usually by the snooker table), and the dreaded metal bridge of death (every hole in the wall that has what they consider a pool table). Maybe that will even inspire you to carry your very own bridge head in your case. Maybe you will start pulling out the bridge without an ounce of trepidation about the outcome.
Maybe you will even start to like it. MAYBE...
*In this article, we feature the Ultra Light Retractable Bridge Stick in order to properly showcase Jennifer Barretta’s tips for using a mechanical bridge.
- RELATED ARTICLES
- The Right Bridge for the Job – By Samm Diep
- Pool Pointers, Decoded! – By Jennifer Barretta
- Where should I be looking during my stroke? – By Tom Simpson